
Paper Mache: The Ghoul Friday Way
For those of you new to creating paper mache (or papier mache) props of your own, the idea might be exciting but daunting. Where to start? What materials should I use? What can I use as a base to copy or imitate a shape? Let me begin by sharing my own techniques and general advice regarding newspaper mache and how to make a copy of a form or object. At the end I've written about using toilet paper and paper towels.
Section 1: Preparation
Materials I have on hand for any paper mache project:
-
Newspaper
-
Paper Towels/Toilet Paper
-
Damp Cloth/Rag (for a quick cleaning of my hands should I need to handle something)
-
White Glue
-
Wooden Skewer or Japanese Take-out Chopstick (for stirring the glue)
-
Tinfoil
-
Modeling Clay
-
Acrylic Paint
-
Paint Brushes
Work Surface
Make sure you have plenty of space to lay out your materials. Most often, I cover the work area in an inexpensive plastic table cloth (or a large sheet of thick plastic vapour barrier), lay out a few sheets of newspaper to sop up glue droplets, and flattened cardboard boxes. The bonus of using cardboard is you can swivel the cardboard easily to see and access all sides of a prop as you work ( also when you put your sticky hand down on the table, cardboard won't become attached to it like paper and plastic will).
Newspaper
Tear the newspaper into strips of different sizes. Don't fuss with scissors or try to be neat about it. I find torn pieces tend to give a nicer finish.
I try to avoid using glossy paper. You can use it - and some people say it produces a tougher end product - but I find it isn't as friendly a medium to work with.
I like to spend five minutes tearing up the newspaper all at once and putting it in a big ziplock bag. This way, I am not running out of paper midway through a project and having to stop and wash my hands to rip up more. If you take out handfuls at a time, the rest are protected inside the bag from flying droplets of glue. Plus, if there's extra left over you'll have it all packed up and ready for use next time.

If you're using paper towels or tissue, have that torn into different sizes and put aside ready to use as well.
Some people use basic white office paper for their mache. They will do one layer in white paper and the next layer in a different colour so they can see if they've missed anything. This strikes me as being overly cautious. Also, I don't use writing paper because a) I like to recycle flyers and free papers dropped at my door, and b) I'm frugal.
Glue Mix
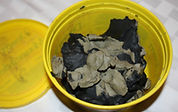
There are countless glue recipes out there for paper mache. Everyone has their own preferences for different reasons. I will go into detail about them later, but for now, here's what I use: approximately 1 to 2 parts white glue to 1 part water. That's it. Play around with the ratio as you go along, varying for the type of project you're doing and the thickness/strength of glue you're using.
What's the advantage to that?
-
Eventually the glue and water separate while you work. Instead of having to use a stir stick or risk the lid slipping and glue spilling everywhere, I simply cover the tiny hole on the bottle and give it a shake. Easy-peasy. One second.
-
The longer you have your container of glue open, the more the water evaporates, the more you have to stop what you're doing to add more, and the more glue you waste. The glue bottle solves this problem.
-
I have total control over the amount of glue/water mix I'm putting on a strip. This is a huge plus for me, especially when working with smaller pieces.
As for the technique, I essentially lay the paper strip in my hand, squirt a line of glue/water mix on top of the paper, massage the glue mix into the paper by placing my other hand against the first (creating a paper sandwich) and gently rubbing them together/along the paper. I then flip the paper over and repeat if needed.
There are benefits to using a large wide-mouthed container (with a lid) to mix water and glue in with disposable chopsticks if I am working on some project that requires a majority of the newspaper pieces to be overly large, or I'm dunking fabric. You can dip your strips into the container, submerging them fully before running them through your fingers to remove excess glue.
Most often I use a regular sized glue bottle. You know, the kind in classrooms handed out to the kids? The size you might keep in your desk at work. I pour the glue and water into the small bottle from my industrial sized stock bottle. Give it a shake, and I'm off to the races.

Section 2: The Base
Tinfoil

Tinfoil is a gift from craft deities to paper mache people. It enables you to make a cast out of almost anything without locking that item inside one project forever. Think of it is a poor man's casting mold. You can create a copy - or cast - of an item by covering it with sheets of overlapped tinfoil before you start to mache. If you find the tinfoil won't lay flat at the edges, you can use masking tape to encourage it to behave.
I have done this with styrofoam wigheads, mannequins, skulls and even bowls. Depending on the prop, I found a solid item resembling the desired shape I had in mind and used it as a base beneath two layers of paper strips.
When the final mache layer is dry, you simply cut a slit along one side of the cast and ease it off the base item. I go into detail on how to do this in the next section.
Modelling Clay
Modelling clay is great to build up a form or enhance an existing shape from which you would like to create a cast copy. You can use it over and over as long as you take care of it (i.e. keep it clean and sealed in a container when not in use). It's heavy enough that even if it gets warm, it generally keeps its shape beneath the tinfoil as you apply the newspaper. Since it is so bulky, remember this: once you add two or three layers of mache, converse items (shapes like bumps and cheekbones - anything that's raised or sticks out) will be bigger; concave items (like eye sockets or hollowed cheeks) will be filled in more than your original sculpted shape. So the rule of thumb is to slightly exaggerate openings, holes and divots, while holding back a little on bumps. You can easily make bumps bigger later.

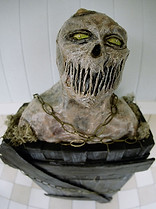
Modeling clay also helps you to plot out a design or face. For example, when I made some ghoulies, I put modelling clay over the face of a doll, stuck the rubber eyeballs and teeth in place (adjusting it to experiment with different positions), covered it with tinfoil and then layered my mache over top. The modelling clay kept the eyes and mouth in place throughout the entire process, giving me raised eye sockets to use as eyelids and a curved mouth as a reference for where the lips will be.
Sometimes modeling clay likes to hold onto the cast. Don't panic. Ease your fingers or the handle of a paint brush (or the edge of a butter knife) between the clay and the tinfoil layer. Gently wiggle it free a little section at a time. Be patient. In some situations it's easier to remove a stubborn cast and the clay together. Worst case scenario is that you may have to cut the cast into two complete halves in order to ease it off.
Alternatives
I mentioned earlier that you can use crumpled tinfoil as a base for small items. Wire works well too.
For medium sized figures and items - especially orbs or hills - I've used crumpled newspaper taped down to a cardboard base. I then put larger pieces of paper mache over top (to smooth the surface) and spray painted it with speckled concrete paint to make fake rocks.
For larger items, you can use chicken wire to create armatures/shapes to mache over. The thing about chicken wire is that if you're not mindful while using

paper mache to cover it, you could end up with the outlines of the octagon shapes showing through (I discovered this the hard way). And please, anytime you use chicken wire, wear long sleeves and gloves. Those cut ends are sharp.
I've used boxes for a torso, paper towel rolls for arms, and fleshed them out by taping rolled up plastic bags around them. The example directly right is my prop 'Bubblehead'.
There's the trusted and true method of pvc pipe frames for life-size figures, but I'll leave that to fellow haunters who have perfected that type of armature how-to.
Section 3: Application
-
If using a container vs glue bottle, dip the strip of paper into the glue mix, covering it completely.
-
Squeegee off the excess glue by gently running the dipped strip between your thumb and index finger.
-
Lay the strip flat against the tinfoil (or whatever base you are using) and smooth the edges down. Make sure you work it into any crevices.
-
Overlap the edges of each strip of paper you add.
-
Use smaller pieces of paper for divots and bumps.
-
Make sure you let the first layer of paper dry completely before adding a second layer. If you rush ahead and keep piling up wet newspaper, you'll end up with mushy areas and encourage mildew.
With smaller to medium sized items that are built on something solid that I won't be removing from my prop, I find two to three layers is good enough. For items you've removed from a solid base, you may wish to do three to four layers. Use your best judgment.
After you remove the cast from the base (so now you have a hollow form), you need to stuff it. If you can afford it, use expanding spray foam (also good for intestines, by the way). If you have only a little bit of cash, use a combination of spray foam and crumpled newspaper. If you're broke and frugal like me, use whatever you have: crumpled newspaper and plastic bags are usually what I choose. Styrofoam from packaging works well too to bulk up the middle. The stuffing material should be somewhat lightweight but fairly solid once it's crushed together.


Whatever you use, make sure you get into the crevices of your prop. You don't want him to topple over or get bumped into and suffer a dented head or pushed in nose. Seal it up with tape and more newspaper. And you're ready to decorate.
Toilet Paper & Paper Towels
Using toilet paper instead of newspaper when you mache gives you an entirely different textured effect. While it's my least favourite medium to work with, it gives the most interesting results. For example, I used toilet paper for my plant projects. I wanted a lot of fine texture for the foliage.
It can completely disintegrate into a pulpy mush so easily with too much glue or too much fussing. Don't be discouraged. After a bit of trial and error, you get a feel for it. Here's some tips to help you out.
Tip 1: A Small Amount of Glue
No matter what application technique you use (see the next tip), you will only need the tiniest bit of glue/water mix (or whatever paste you are using). The glue will soak through the entire piece of toilet paper even with the most minuscule amount.
Tip 2: Find the Best Application Technique for You
Let's say you are working with a square of toilet paper. For larger details like the big leaves, I might dip an edge in the glue so that it touches the surface. I then fold the piece in half (dry to wet) or twist it a couple of times before applying. The glue will seep through the whole thing. And remember, it doesn't need to be completely soaked to stick.
You could try putting the piece of toilet paper on the prop, and then use your finger to apply the glue on top of it.
Some people like to use a paint brush. Using a brush (one that you aren't very attached to), you can put the glue on the actual prop and then put the toilet paper over top, smoothing it down with your fingers. Or you can put the toilet paper on a dry prop, and brush the glue over top. Personally, I make a huge mess this way and avoid using a brush with toilet paper.
I've seen suggestions of using a mixture of water with the tiniest bit of glue in a spray bottle and actually spray the toilet paper/prop with it.
Tip 3: Move Quickly
Don't handle it for very long. It will literally dissolve in your fingers. Know where the piece is going before you dip, and don't fuss with it for more than 10 seconds. Get it in place and leave it alone.
Tip 4: Experiment
Make peaks with it, tear it, layer it, roll it...just be sure to give it plenty of drying time. See what happens with less glue, more glue, or a watery glue mix vs a thicker one.
It might look like a dog's breakfast unpainted, but you'd be surprised how it turns out once paint is added.
With new projects/techniques, what I sometimes do is let it dry and paint just a small section to see the result. The good thing about mache is that (generally speaking) you can always add to it.
Don't be afraid to try it out. The results can be very gratifying.

